Qualtrics Integration #
Updated Qualtrics Integration Capacity
Below we present an option for more streamline Qualtrics integration. This has been updated since the publication of
The (Mis)information Game paper.
This page is incomplete. This guide only shows one method to include The Misinformation Game in Qualtrics surveys, but several more options are discussed in The (Mis)information Game paper.
If you are using the Qualtrics Online Survey Platform to direct users to your Misinformation Game site, then you can directly input information such as the user’s ID through The Misinformation Game URL. This allows users to not have to enter their ID manually.
Embedding iframe in Qualtrics (updated) #
Important note. Due to browser settings, iframe integrations may fail if a participant is using Safari. Because of this, we recommend preventing people on Safari from completing your survey if using an iframe integration option.
We have now updated the debrief page within the misinfo game (v2.4.0) to allow for basic communication with a parent page (e.g., Qualtrics survey) when the tool is embedded as an iframe. This allows the game to ‘tell’ Qualtrics that the participant has reached the debrief page of the misinfo game study that you have embedded, which you can then use to trigger the next button. This integration is based on a paper by Benjamin Carter & Alessandro Del Ponte, and we strongly recommend that you cite their paper (along with our paper) if you use this integration method.
Before you insert the misinfo game, you will need to ensure that the formatting in your qualtrics survey is appropriate. To do so, navigate to the look and feel tab of your Qualtrics survey.
- First, navigate to the “Theme” tab and select the “blank” theme - this will avoid any headers used in your university’s Qualtrics theme overlaying the iframe.
-
Then, navigate to the “Style” tab, navigate to “Custom CSS”, and select “edit”. Enter the following and then hit save:
.resp-container { position: relative; overflow: hidden; padding-top: 50%; } .resp-iframe { position: absolute; top: 0; left: 0; width: 100%; height: 100%; border: 0; } #SkinContent{width:100%;} .Skin .SkinInner {width:100% !important;} .Skin .QuestionOuter.Matrix{width:100% !important;} body .Skin #Plug a { display: none !important; height: 0 !important; padding: 0 !important; overflow: hidden !important; } - This should force the iframe to take up the full screen, and will remove the Qualtrics popup which may impede participants’ ability to interact with the iframe.
Now that you have set the appropriate formating, return to the builder tab to begin setting up the iframe.
- In the qualtrics block that you wish to embed the iframe create a text/graphic question. You should remove any default text so that the textbox is empty.
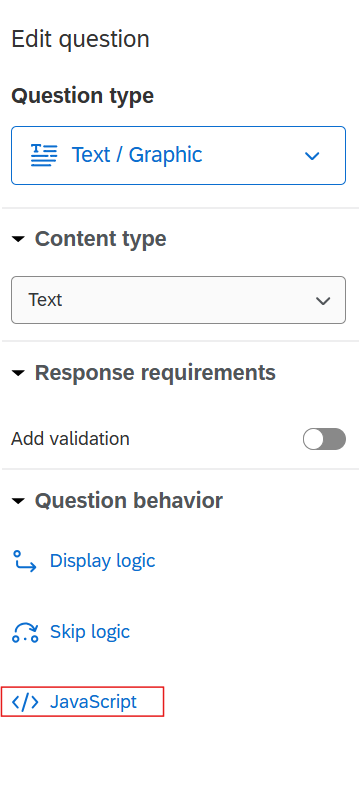
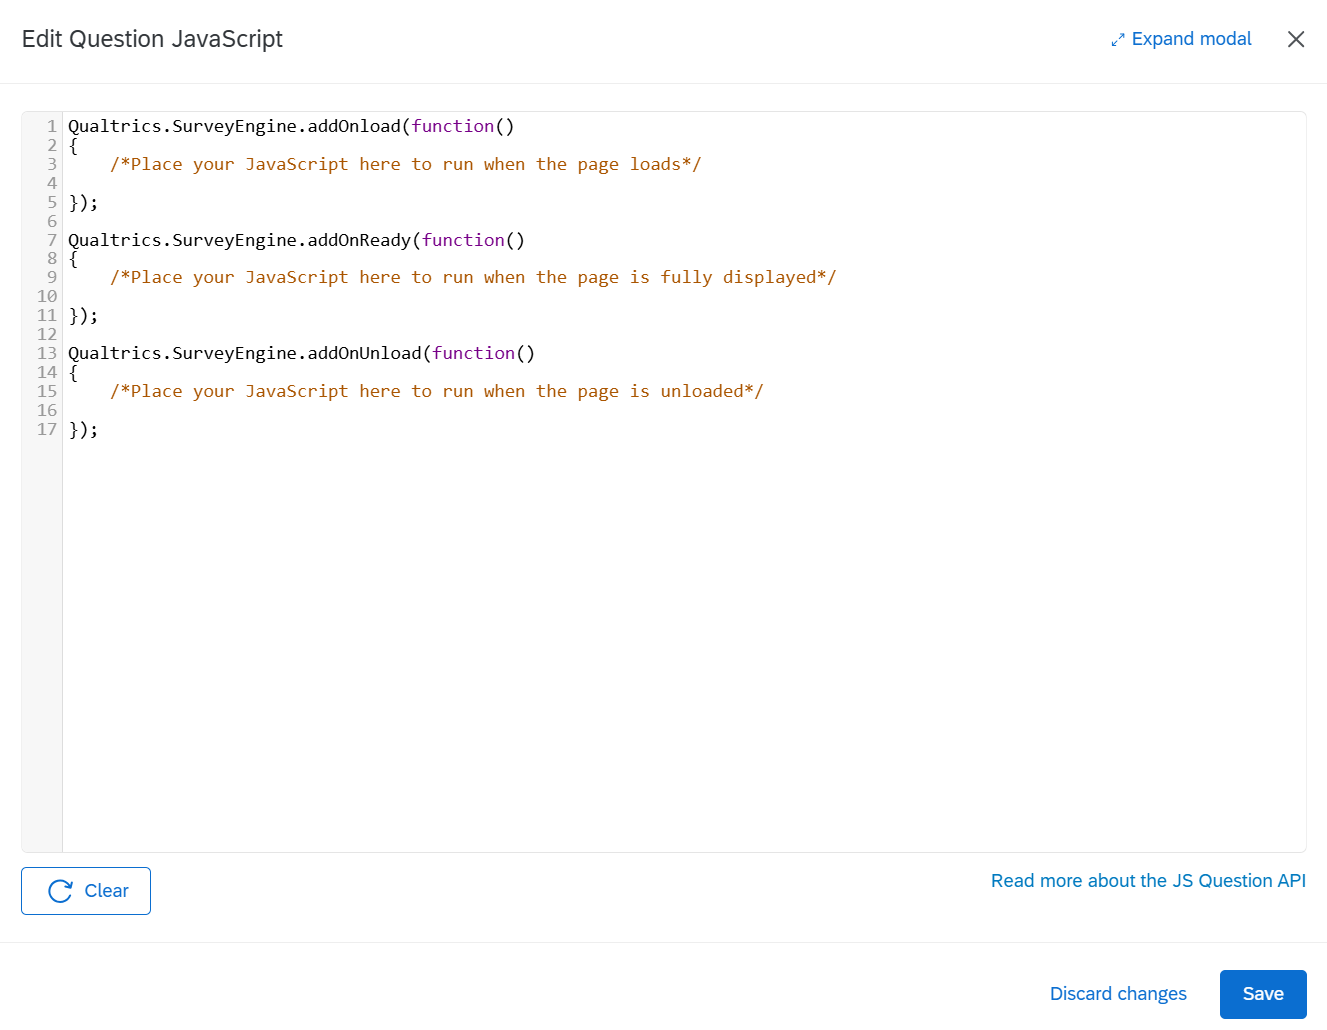
- Click on the question that you have just created, and in the lefthand side panel titled “Edit question” select JavaScript (see Figure 1). This should open to look like the JavaScript editor shown in Figure 2.
-
You should now replace the text in the Javascript editor with the following. Note you will have to change the src to match the corresponding URL. If you wish to pipe the participant ID, you will need to add ?id=
to the end of the URL, which we recommend to set using embedded data (more information can be found in our paper): Qualtrics.SurveyEngine.addOnload(function() { // Insert the game iframe jQuery("#Header").html('<iframe allowfullscreen src="https://<your_domain>.web.app/study/<your_study_id>" class="resp-iframe"></iframe>'); // Adjust page layout jQuery("#SkinContent").css("width", "0px"); console.log("Listening for game completion message..."); // Get the Next button var nextButton = document.getElementById("NextButton"); if (nextButton) { nextButton.style.opacity = "0"; // Make it fully transparent nextButton.style.pointerEvents = "none"; // Disable interaction nextButton.style.position = "absolute"; // Prevent it from affecting layout nextButton.style.visibility = "hidden"; // Ensures it doesn't take up space } // Listen for postMessage events window.addEventListener("message", function(event) { console.log("Received message from iframe:", event); // Check for game completion message if (event.data && event.data.type === "gamecomplete") { console.log("Game complete message received. Showing Next button immediately."); // Show and enable the Next button immediately if (nextButton) { nextButton.style.opacity = "1"; // Make it fully visible nextButton.style.pointerEvents = "auto"; // Enable interaction nextButton.style.position = "fixed"; // Position it properly nextButton.style.bottom = "20px"; nextButton.style.right = "40px"; nextButton.style.visibility = "visible"; // Ensure it's now visible console.log("Next button is now visible and enabled."); } } }, false); }); - This forces the Qualtrics next question button to appear when the participant has reached the debriefing page in the misinfo game. This is done by the game sending the “gamecomplete” message to the parent frame.
-
You may wish to delay the next button appearing for a set amount of time before the participant continues (e.g., to increase the chance of them reading the information presented). To do so, you will need to edit everything from the “Check for game completion message” to. You will need to change
<insert timing in milliseconds>to the amount of time you want to delay the next button appearing for (e.g., if you want to add a 3 second delay add 3000 here):// Check for game completion message if (event.data && event.data.type === "gamecomplete") { console.log("Game complete message received. Delaying Next button appearance by X seconds."); // Hide and disable the Next button completely if (nextButton) { nextButton.style.opacity = "0"; nextButton.style.pointerEvents = "none"; nextButton.style.position = "absolute"; nextButton.style.visibility = "hidden"; } // After X amount of time, show and enable the Next button setTimeout(function() { if (nextButton) { nextButton.style.opacity = "1"; // Make it fully visible nextButton.style.pointerEvents = "auto"; // Enable interaction nextButton.style.position = "fixed"; // Position it properly nextButton.style.bottom = "20px"; nextButton.style.right = "40px"; nextButton.style.visibility = "visible"; // Ensure it's now visible console.log("Next button is now visible and enabled."); } }, <insert timing in milliseconds>); } }, false); });
Inserting a link to redirect to misinfo game #
Setting up the survey #
In Qualtrics you will need to set up the survey as follows:
- First, create a question which asks for the user’s ID
- Second, create a page break
- Thirdly, create a question which is used to display the URL
Once you have completed this you will need to set up “Piped Text” on the question that displays the url.
To do this click on the question’s displayed text. After this you will see a blue tab with “Piped Text…” written. Click on this tab.
After clicking on the tab you will see a dropdown. Select the “Survey Question” option, which will then open another drop down. Select the question where the user inputs their ID, and then select the option which is not “Question Text.” (The name of the item will change depending on your own survey.)
The final text in the question will be in the following format:
<b>
After this your survey will contain the following questions in the
following format:
<img src="screenshots/Qualtrics-Example.png" alt="Example Qualtrics Survey" height="258" />